Running Play with Docker on AWS

Table of contents
Some weeks ago I dived a little bit into the Play with Docker GitHub repository because I would like to run Play With Docker (called PWD) locally to have a backup option during a Docker Meetup if something would be wrong with the internet connectivity or with the Docker prepared workshop sessions.
The most important thing first: Running PWD locally means, running it on localhost per default and this will not allow others to connect to the PWD setup on your localhost obviously.
Second, I read a PWD GitHub Issue where a user asked how to run PWD on AWS and I thought, that this would be a nice to have and of course I would like to help this user. So, that’s for you Kevin Hung too.
Third, due to our job as Cloud Solution Architects at STRABAG BRVZ IT we have the possibility to try out things without having to hassle about the framework conditions. This blog is a Holidays gift from #strabagit. If you like it share it, as sharing is caring. :-)
To be honest, this blog post will be very technical (again) and there are a lot of probably other ways to achieve the same result. Therefore this post is not meant to be the holy grail and it is far from being perfect in the meaning of security, eg authentication. This post is meant to be a cooking recipe - feel free to change the ingredients as you like! I will try to describe all steps detailed enough so that everyone could derive it to the personal needs and possibility.
Tipp: It might be helpful to read the whole article once before start working with it!
Ingredient list
As every cooking recipe needs an ingredient list, here it comes:
- AWS account (but you can use another cloud provider too)
- EC2 (a free tier AMI is ok for testing)
- Route53 (needed, as otherwise no one can connect to your PWD installation)
- Ansible (we use Ansible for IaaS tasks, but I will try to explain everything, so you can get it up and running with out it though)
- Domain(you need a domain! A free domain from FreeNom is enough)
The recipe
This is going to be a cloud solution, hosted on AWS. And as with nearly every cloud solution it is hard to bootstrap the components in the correct order to get up and running because there might be implizit dependencies. Before we can cover the installation of PWD we have to prepare the environment. And first of all we need the internet domain name we would like to use, as this name needs to be known later during the PWD configuration.
1. The domain and AWS Route53
As written above, a free domain from Freenom fits perfect! Therefore, choose a domain name and register it there on Freenom. At this point, we have to do two things in parallel, as both, your domain name and the AWS Route 53 configuration are depending on each other!
If you have registered a domain name on Freenom move to your AWS console and start the AWS Route53 dashboard. Create a public hosted zone there with your zone name from Freenom. What we would like to achieve is a so called DNS delegation. To achieve this, write down your NS records you get, when you create a hosted zone with AWS Route53. For example I registered m4r10k.cf at Freenom. Therefore I created a hosted zone called m4r10k.cf in AWS Route53 which results in a list of NS records, in my case eg ns-296.awsdns-37.com. and ns-874.awsdns-45.net.. Head over to Freenom, edit your domain name and under your domain configuration choose DNS and use the DNS NS records provided by AWS Route53. See the picture on the right for details.
We will need the AWS Route53 hosted domain later to automatically register our AWS EC2 instance with an appropriate DNS CNAME entry called pwd.m4r10k.cf.
2. The AWS EC2 instance and Play with Docker installation
As mentioned above, we are using Ansible to automatize our cloud setups but you can do all the next steps manually of course. I will reference the Ansible tasks in the correct sequence to show you how to setup Play With Docker on a AWS EC2 instance. The process itself is fully automated but once again, you can do all this manually too.
At first we start the AWS EC2 instance which is pretty easy with Ansible. The documentation for every module, in this example this is ec2, can be found in the Ansible documentation. The most important thing here is, that the created instance is tagged, so we can find it later by the provided tag. As operating system (AMI), we use Ubuntu 18.04 as it is easier to install go-dep which is needed later.
|
|
After that, we install the needed software into the newly created AWS EC2 instance. This is the longer part of the Ansible playbook. Be aware that you might have to wait a little bit until the SSH connection to the AWS EC2 instance is ready. You can use the following to wait for it. The ec2training inventory is dynamically build during runtime.
|
|
The next thing we have to do is to install Python as the AWS EC2 Ubuntu AMI does not include Python. Python is needed for the Ansible modules. Therefore we install Python into the AWS EC2 instance the hard way.
|
|
Now we go on and install the whole Docker and PWD software. Here comes the description of the tasks in the playbook. The most important step here is, that you replace the localhost in the config.go file of PWD with your Freenom domain!
- Ping pong: Check if Ansible and Python works correctly
- Add Docker GPG key: Add the Docker apt repository GPG key
- Add Docker APT repository: Add the Docker apt repository
- Install Docker: Install the Docker version given by var docker_version
- Apt mark hold Docker: We hold back the Docker package, we do not want that it gets automatically updated during system updates
- Install go-dep: Install go-dep because we need it later for the Play With Docker dependencies
- Install docker-compose: Install docker-compose because we need it later to start Play With Docker
- Add ubuntu user to Docker group: We add the ubuntu user to the docker group to be able to run the Docker commands without sudo
- Run Docker Swarm Init: We create a Docker swarm because this is needed by PWD
- Git clone Docker PWD: Now we clone the PWD repository from GitHub to the correct local folder
- Run go dep: Now we run go dep to resolve all dependencies which are needed by PWD
- Replace localhost in config.go of PWD: This is the most important part! Replace this with your Freenom domain name!
- Docker pull franela/dind: Pull the needed Docker franela/dind image
- Run docker compose: Start the Docker compose file.
|
|
3. Automatically create the AWS Route53 CNAME records
Now the only thing left is to create AWS Route53 CNAME records. We can use Ansible for this too. The most important thing here is, that you also create a wildcard entry for your domain. If you later run Docker images which are exposing ports, like Nginx for example, PWD will automatically map the ports to a dynamic domain name which resides under your PWD domain.
|
|
How does it looks like
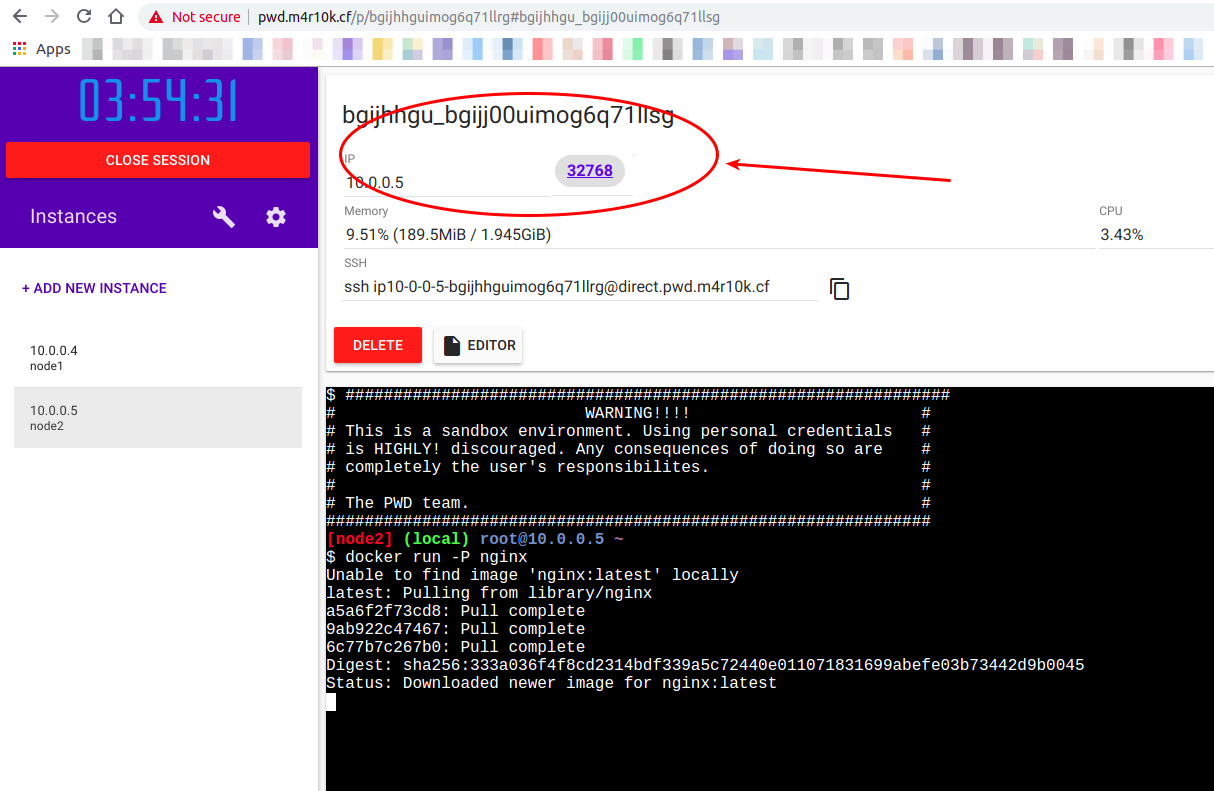
After the setup is up and running, you can point your browser to your given domain, which in my case is http://pwd.m4r10k.cf. Then you can just click the start button to start your PWD session. Create some instances and start a Nginx for example. Just wait a little bit and the dynamic port number, usually 33768, will come up and you can just click on it to see the NGinx welcome page.
Sum Up
This blog post should show, that it is possible to setup a Play With Docker environment for your personal usage in Amazons AWS Cloud fully automated with Ansible. You can use the PWD setup for different purposes like your Docker Meetups. Furthermore you do not have to use Ansible, all steps can also be done manually or with another automation framework of course.
Have a lot of fun, happy hacking, nice Holidays and a happy new year!
-M
 Doing Linux since 2000 and containers since 2009. Like to hack new and interesting stuff. Containers, Python, DevOps, automation and so on. Interested in science and I like to read (if I found the time). My motto is "𝗜𝗺𝗮𝗴𝗶𝗻𝗮𝘁𝗶𝗼𝗻 𝗶𝘀 𝗺𝗼𝗿𝗲 𝗶𝗺𝗽𝗼𝗿𝘁𝗮𝗻𝘁 𝘁𝗵𝗮𝗻 𝗸𝗻𝗼𝘄𝗹𝗲𝗱𝗴𝗲. [Einstein]". Interesting contacts are always welcome - nice to meet you out there - if you like, do not hesitate and contact me!
